🧙♂️ Just like magic!
Your A2P Compliance Kit is Ready!
Thanks for using A2P Wizard. Below is everything you need to get your campaign approved.
🔁 Ready to submit another?
Click Here to Start Over →🚀 Start Here
Your compliance website is ready below. Scroll down to pick your registration type and follow the exact steps for it.
Your custom-built, domain-matched compliance website is ready. It's designed to match opt-in requirements and help your campaign get approved. Hero images on the website may take up to 60 seconds to load.
Use the Copy & Paste sections further down to fill out your application exactly.
🚀 Oops! You've Hit Your Rate Limit
You've reached the limit for free website generations. Upgrade now for unlimited submissions and priority support!
⚡ Upgrade Now for Unlimited AccessReceived this message in error? Please contact admin@a2pwizard.com
💡 Read This First (applies to everyone)
Note: Brand rejections have nothing to do with A2P Wizard. If your brand was outright rejected, it typically means there's an address mismatch or the EIN is invalid. Verify against your client's CP575 form and enter that information exactly as it appears.
However, if you already have a brand approval and then use A2P Wizard, there will be a mismatch. You'll need to open a support ticket with HighLevel (or your CRM's support) and ask them to wipe the brand registration and start fresh. It only takes about 5 minutes to wipe the brand and get it re-approved, but skipping this step can cost you weeks of headaches.
⚠️ Note on Brand Clearing
HighLevel is encountering issues with actually clearing the brand. After submission, verify with support that the brand was truly cleared, not just the GUI. Ask them: "What website do you see on the Twilio brand registration backend?" If they return a different website than the one generated above, or you get rejected for "unverifiable website," it's because they cleared the brand in HighLevel but not the actual Twilio brand application. We strongly recommend creating a new sub-account or using A2P Wizard on a fresh sub-account.
Update your business profile in HighLevel (or your CRM) to match the output from A2P Wizard. You can change it back as soon as you get approved. It also helps to set the business email to the email generated on your A2P site.
📸 Example, Business Profile Setup & Details
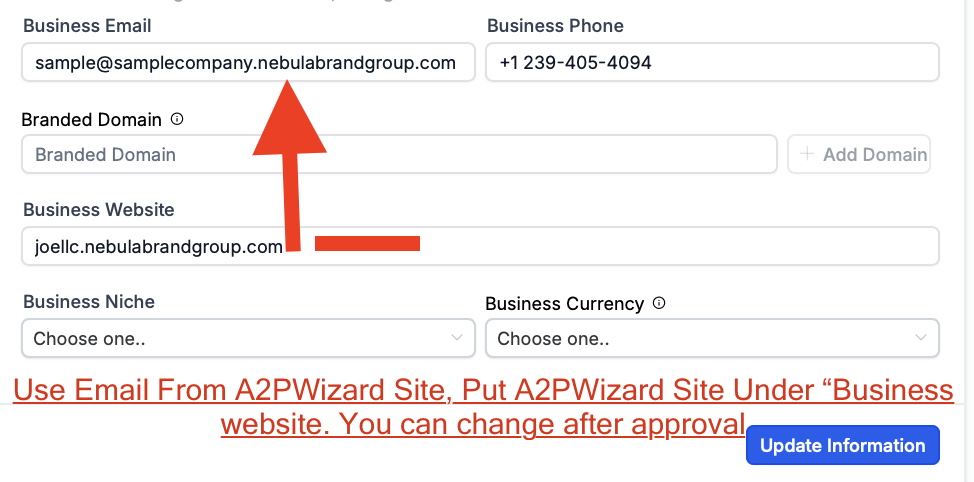
Registering a client with a DBA? Don't use it. Use only what's on their CP575 form. Companies change DBAs all the time, but the legal business name stays the same, use that to register for A2P and you'll see far more approvals.
Registering the legal name and then using the DBA in marketing has zero impact on deliverability. They're the same company. For proof: Subway is legally named Doctor's Associates. We can assure you they aren't sending you texts as "Doctor's Associates."
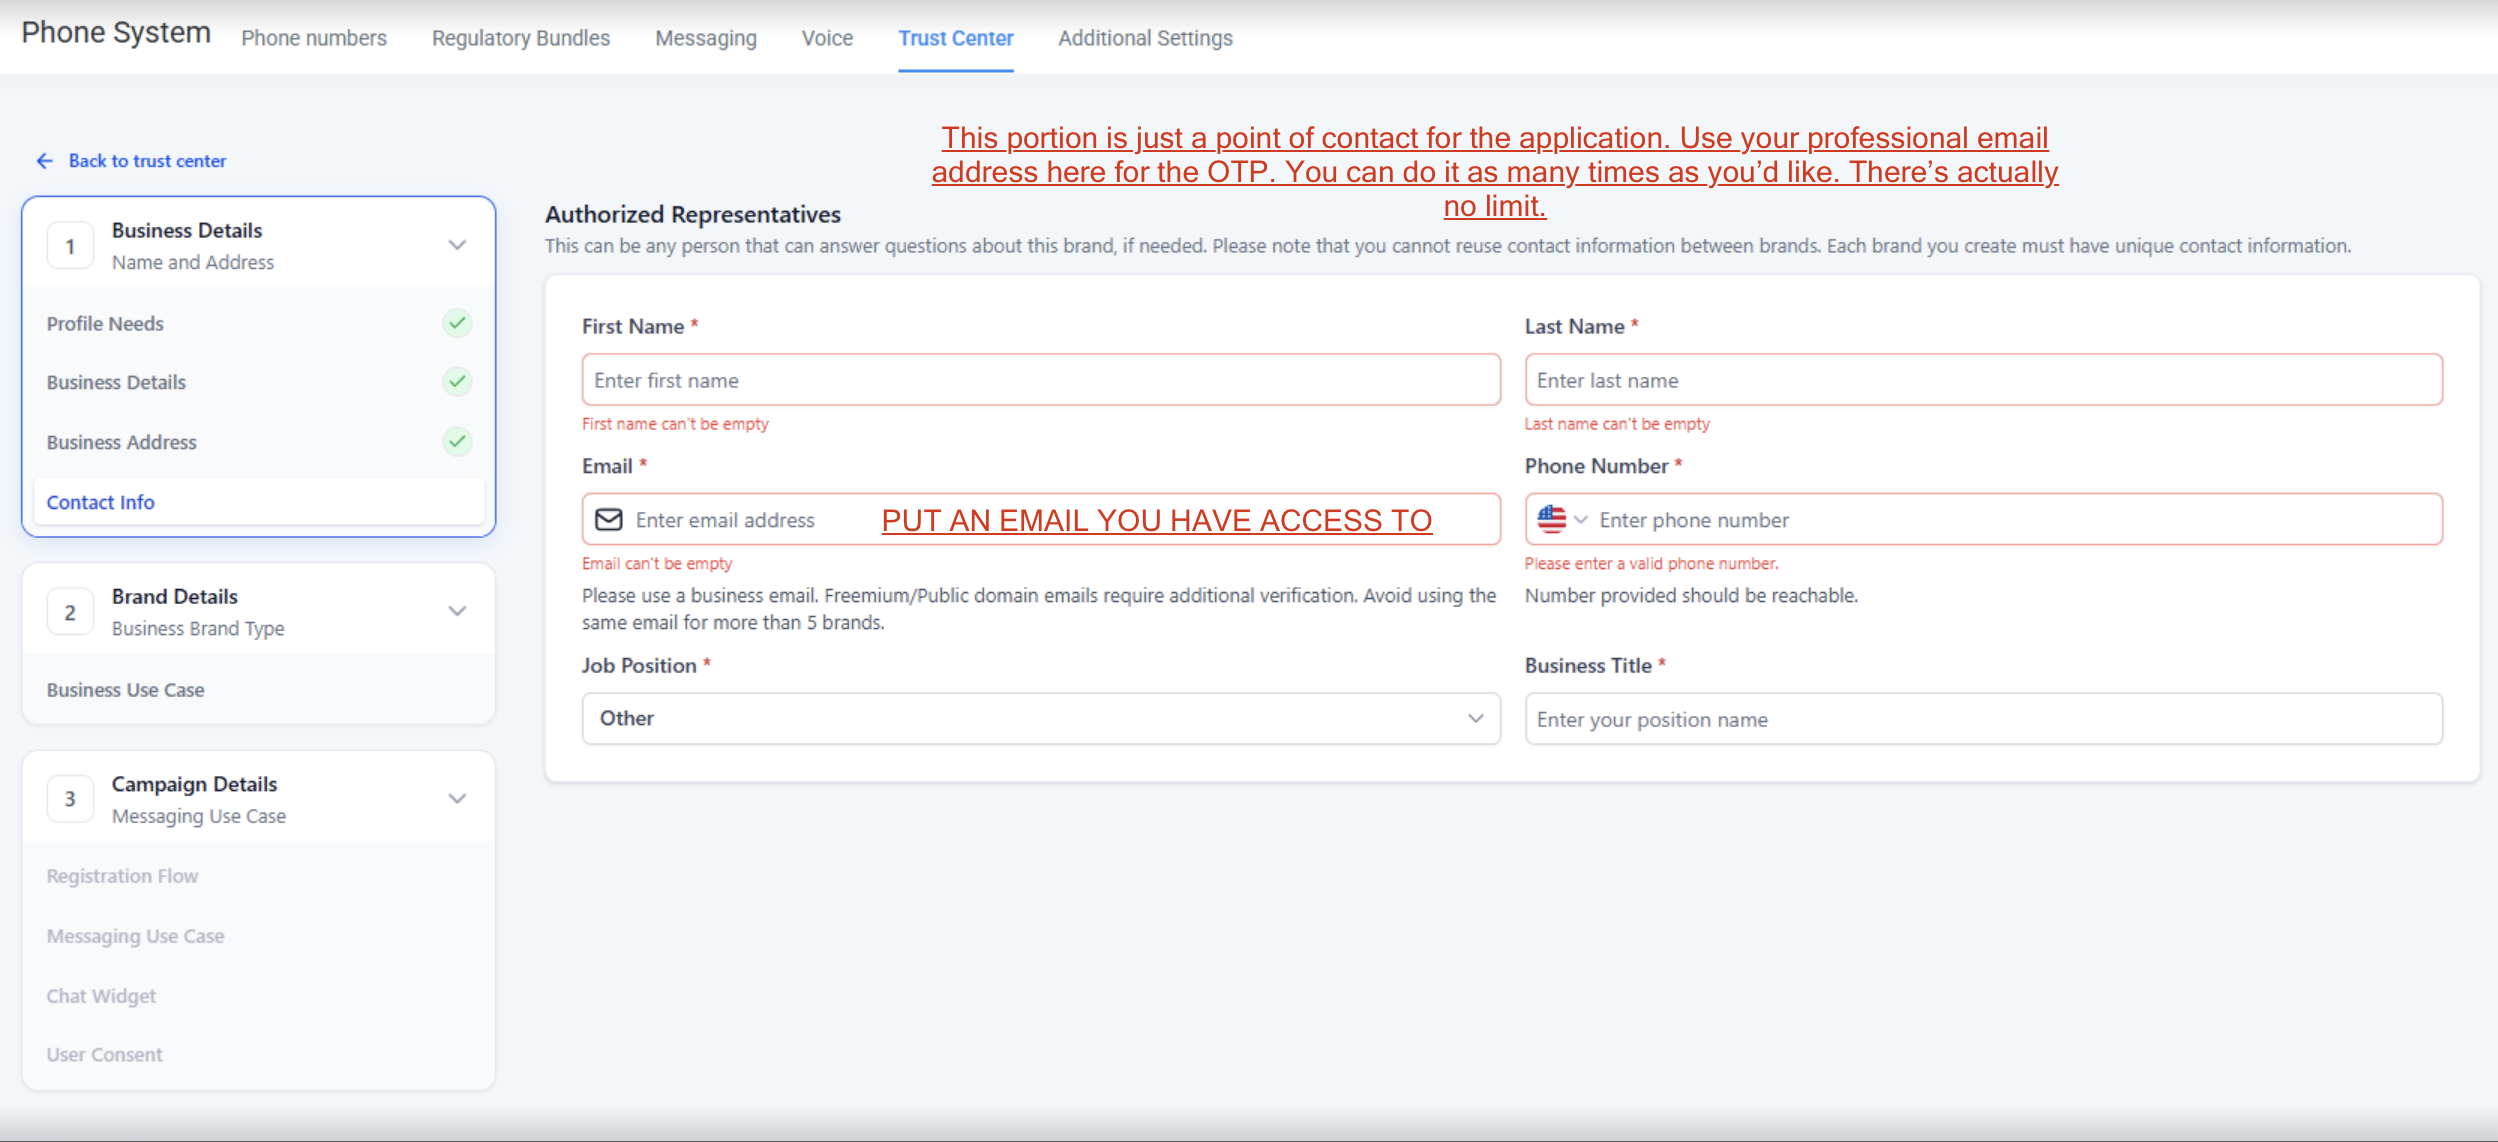
NEW! This is a frequently asked question. The "Authorized Representative" section is just a point of contact for the application, do not put the A2P Wizard-generated email here. Use your agency's email or any professional email you have access to for receiving the OTP. The rest of the information can be your client's. Despite what the GUI says, there is no limit of 5, you can reuse your agency's email an unlimited number of times until we say otherwise.
🧭 Start Here: Select Your Registration Type
👇 Tap one of the options below and your exact step-by-step instructions will appear. Nothing below applies until you pick your type.
✅ Good news: the details you already submitted work for every registration type. Just pick how you're registering below and follow those exact steps.
 Registration Templates
Direct to Carrier
👆
Select your registration type above
Your exact, copy-and-paste step-by-step will appear right here.
📍 Local Registration — HighLevel
Standard 10DLC local number registration inside HighLevel.
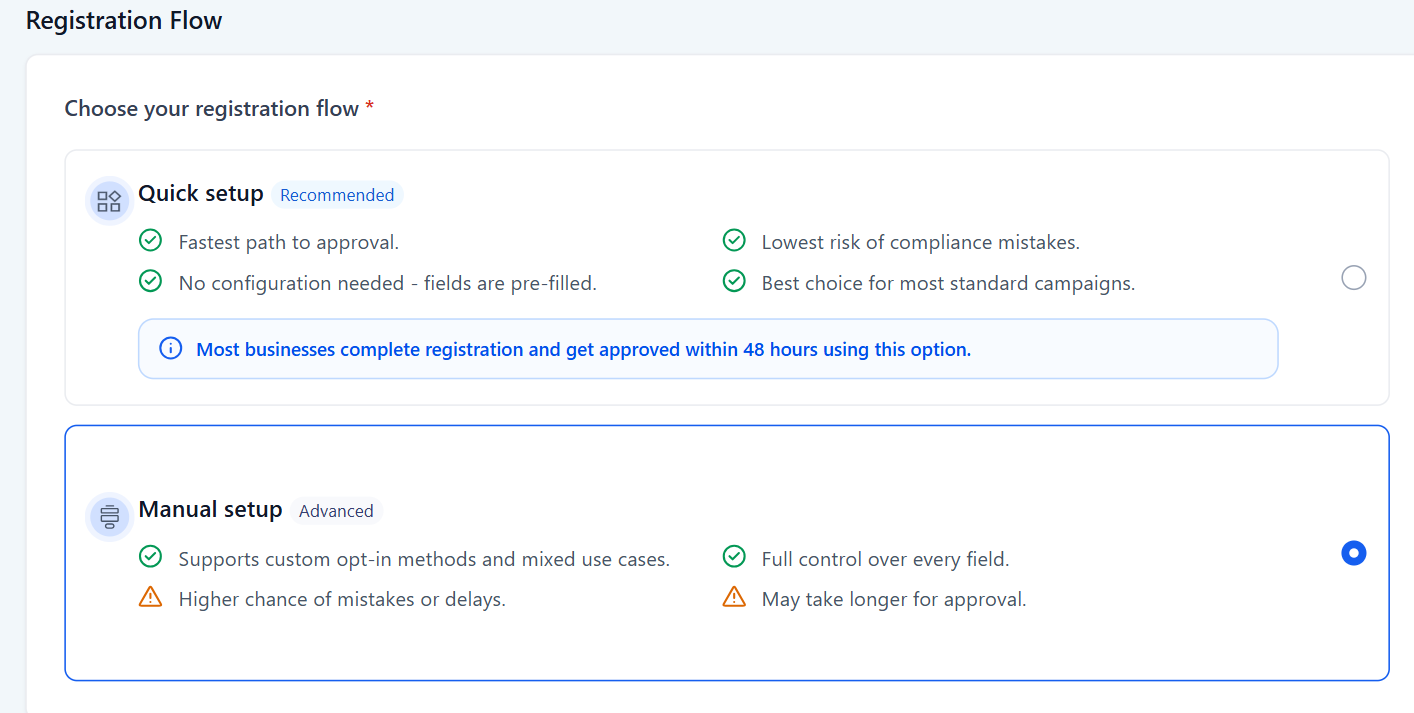
🆕 Select "Manual Setup" (not Quick Setup)
When choosing your registration flow, select "Manual Setup". This gives you full control over every field and lets you use your A2P Wizard-generated website and compliance copy.
Don't be misled by the "Quick Setup" option. While HighLevel labels Manual Setup as having a "higher chance of mistakes," that only applies if you're filling it out yourself without guidance. With A2P Wizard, every field is pre-written and optimized for approval, you're just copying and pasting. Manual Setup is the fastest and most reliable path to A2P compliance without needing to create a domain or get access to your client's actual website.
Do not skip - #1 cause of rejection
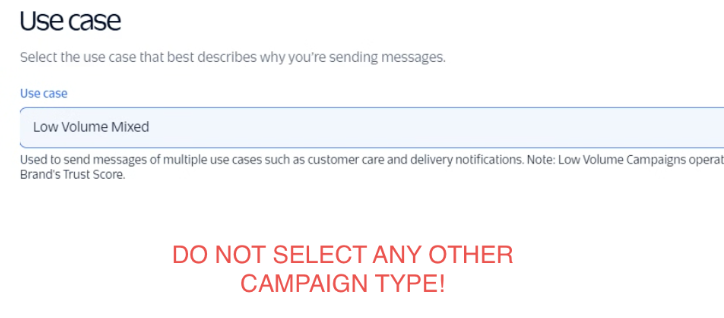
⛔ Select "Low Volume Mixed" or your campaign WILL be rejected
This is the single most common reason campaigns get denied. Picking anything else (Customer Care, Marketing, 2FA, etc.) gets you rejected. It must say Low Volume Mixed, exactly as shown above.
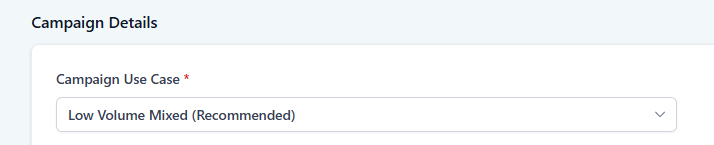
🛑 If you glaze over this and select anything else, your campaign will fail. No exceptions.
✅ Next: scroll down to "Copy These Exactly Into Your Application" and paste each field into the matching section of your campaign.
📞 Toll-Free Wizard — HighLevel
Follow each step below to register your toll-free number.
👤 Registering as a sole proprietor? Same setup, just skip the EIN field, change the entity type to Sole Proprietor, and make sure your site is yourname.nebulabrandgroup.com
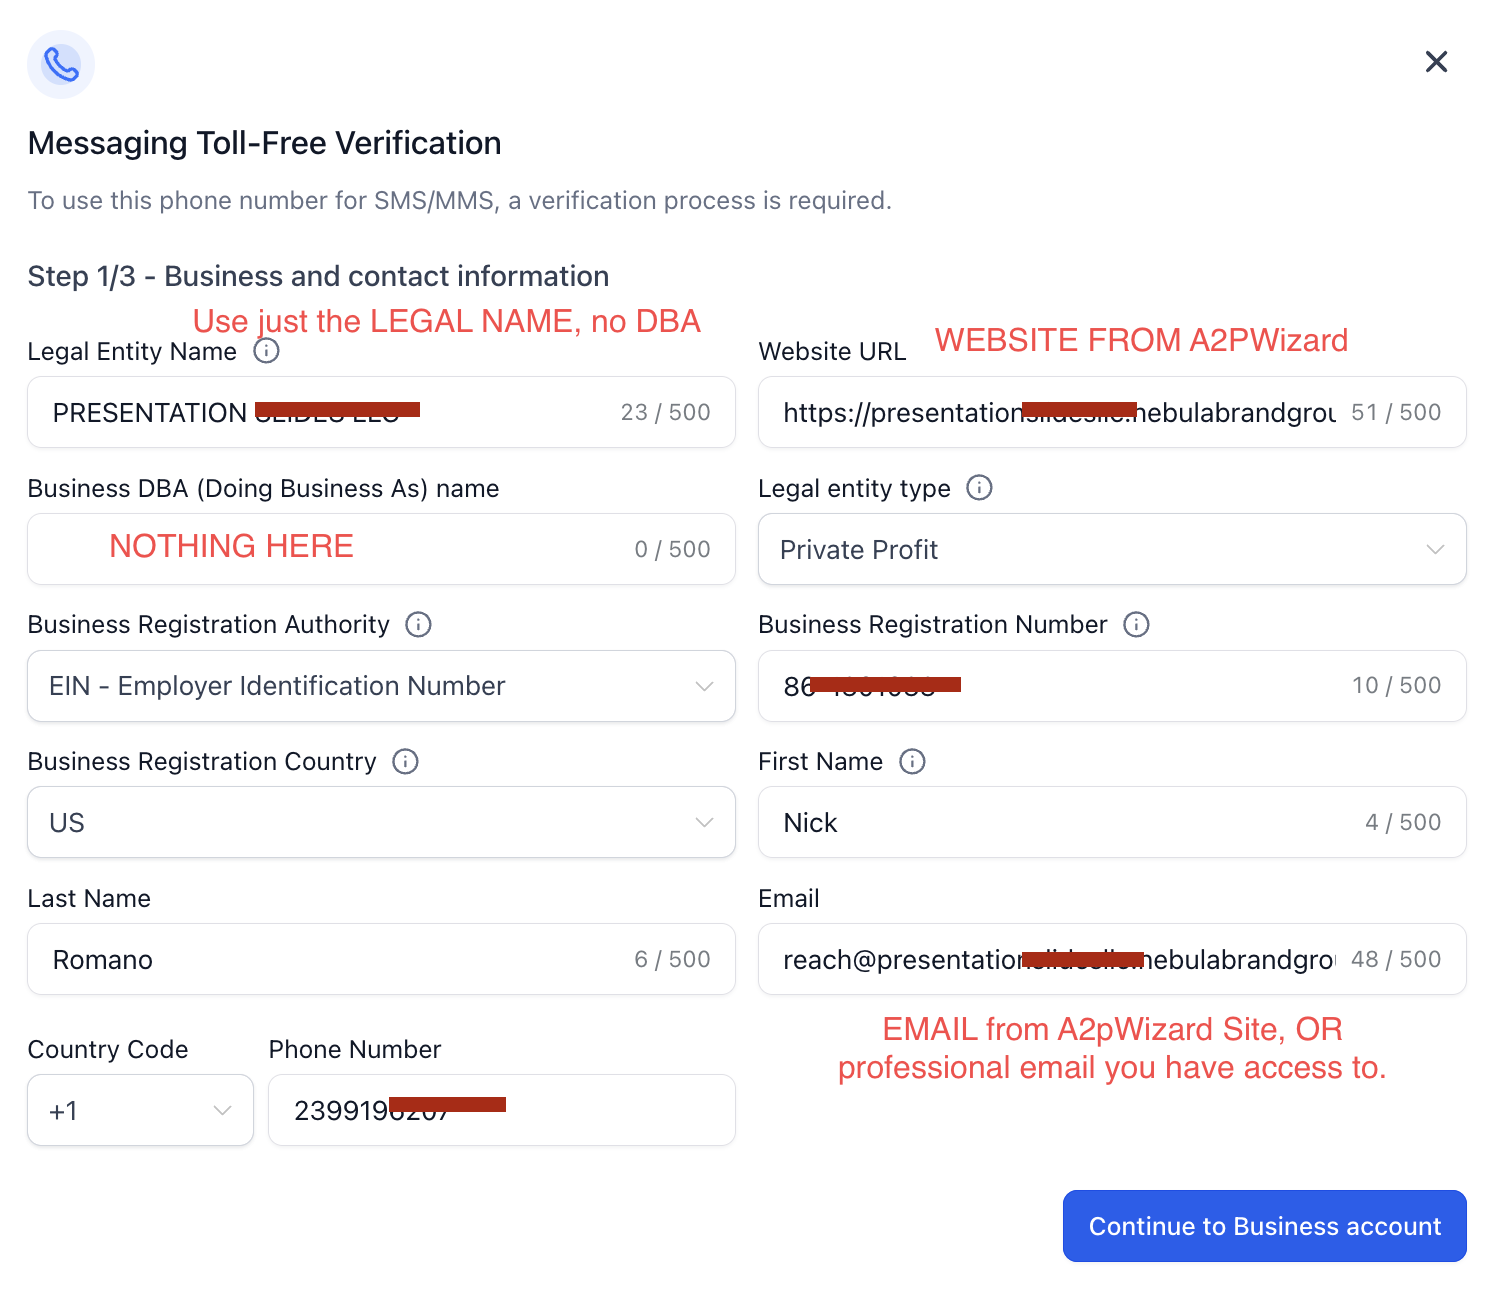
TF Step 1: Business & Contact Information
- Business DBA: Leave this blank.
- Legal Entity Type: Select Private Profit
- Email: If you have an EIN, use the email below or any professional email. No EIN? See the rule below.
Legal Entity Name:
Loading...
Website URL:
Loading...
Email:
Loading...
🛑 IMPORTANT: No EIN? The email type decides pass or fail.
No EIN (sole proprietor)? You MUST use a personal Gmail here. A professional or business email will cause the registration to fail.
Have an EIN? Use the A2P Wizard email above (or any professional email you have access to). It works fine for toll-free.
✅ No EIN, use this
❌ No EIN, not this
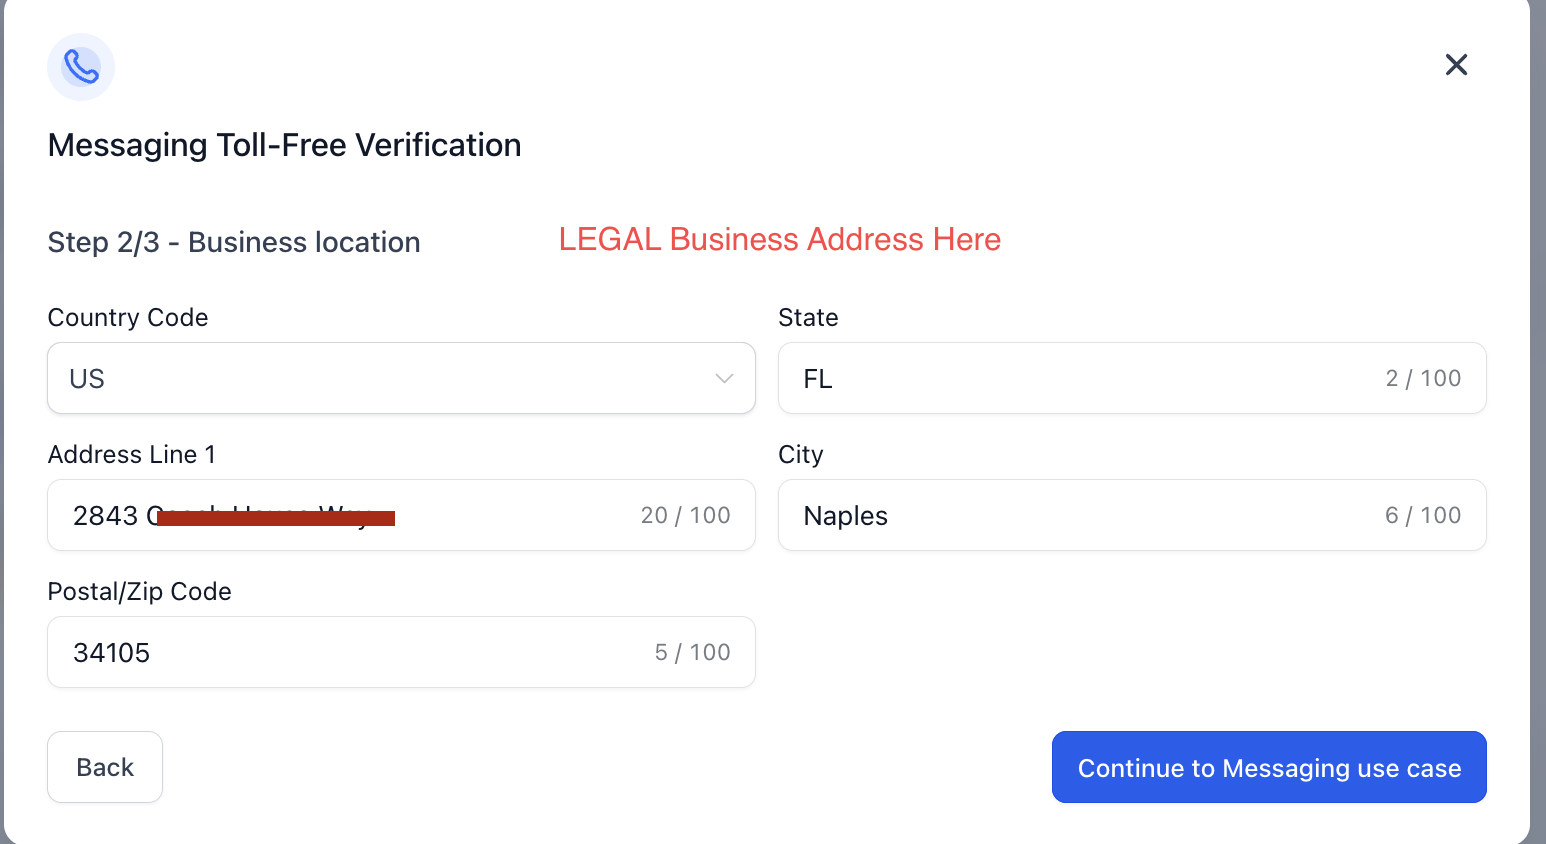
TF Step 2: Business Location
Enter your legal business address exactly as it appears on your CP575 form. This must match what the IRS has on file.
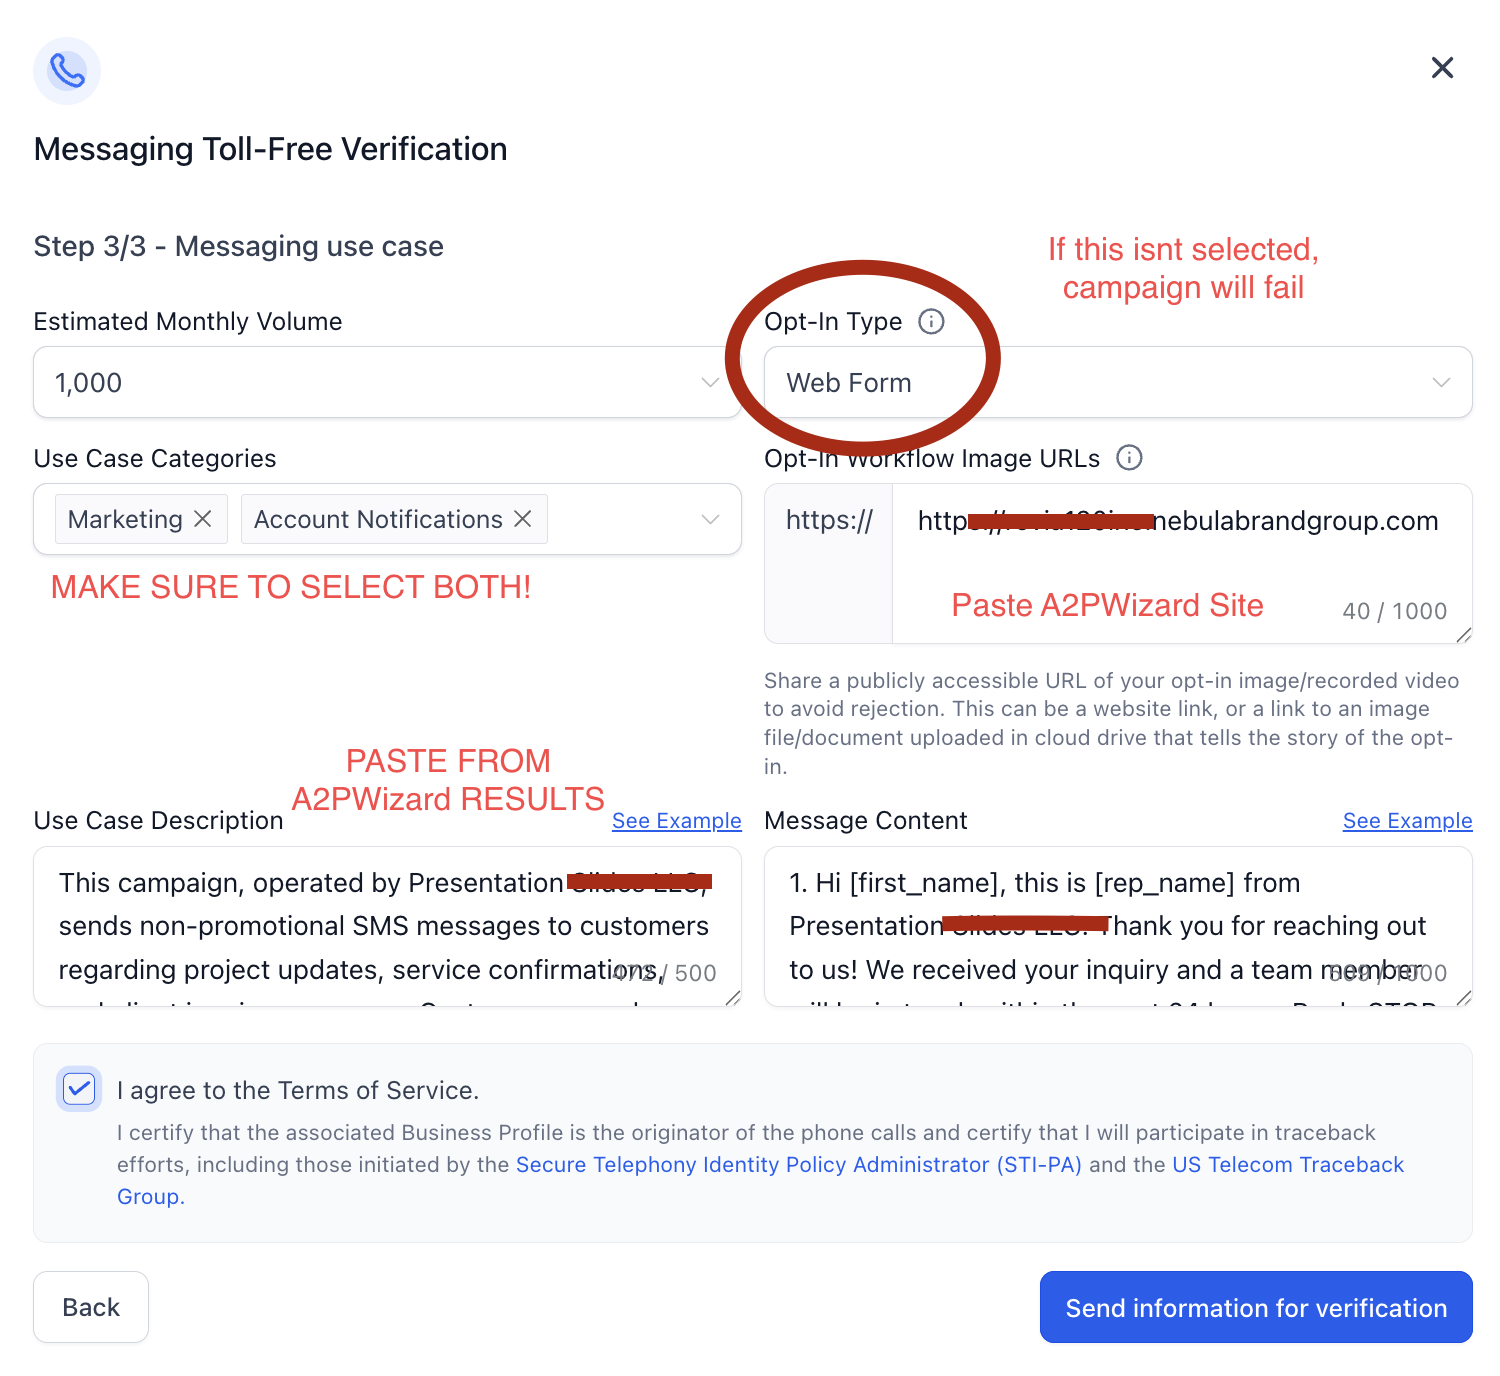
TF Step 3: Messaging Use Case
- Estimated Monthly Volume: Select 1,000
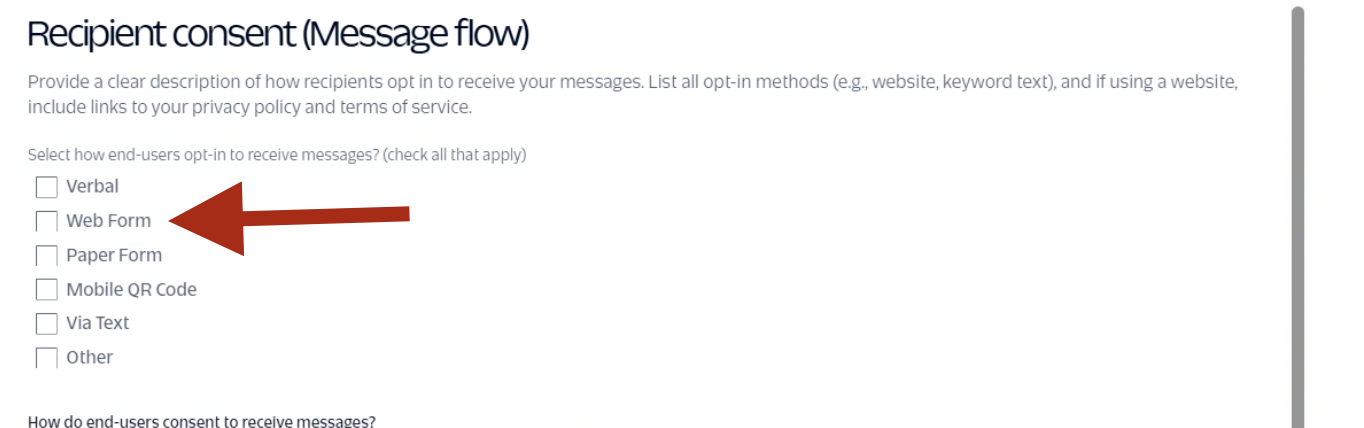
- Opt-In Type: Select Web Form
- Use Case Categories: Select BOTH Marketing and Account Notifications
🛑 You MUST select "Web Form" as the Opt-In Type. If this is not selected, your campaign will fail.
Opt-In Workflow Image URL:
Loading...
Use Case Description:
Loading...
Message Content:
✅ Copy the entire message content below in one shot. Do not edit or insert values.
Loading...
✅ The use case, sample messages, and opt-in copy for toll-free are all included in this section above. Toll-free is self-contained, you do not need the shared copy-paste block below.
👤 Sole Proprietor — HighLevel
Same as a local registration, with a few entity-specific differences.
🛑 Sole prop with no EIN will ONLY work if the individual has no active EIN. If you're getting a brand rejection, they likely have an EIN associated with them somewhere. In that case, follow the same steps below but select that the business HAS a tax ID and enter it in the appropriate fields.
If the EIN is associated with a business name and not just their personal name, you'll need to register the business, not their name. A sole prop EIN registration will only work if they applied for the EIN using their full name.
Getting Started
- Use the client's FULL NAME (no middle initial) as the "Legal Business Name"
- First step is to purchase a phone number and complete verification
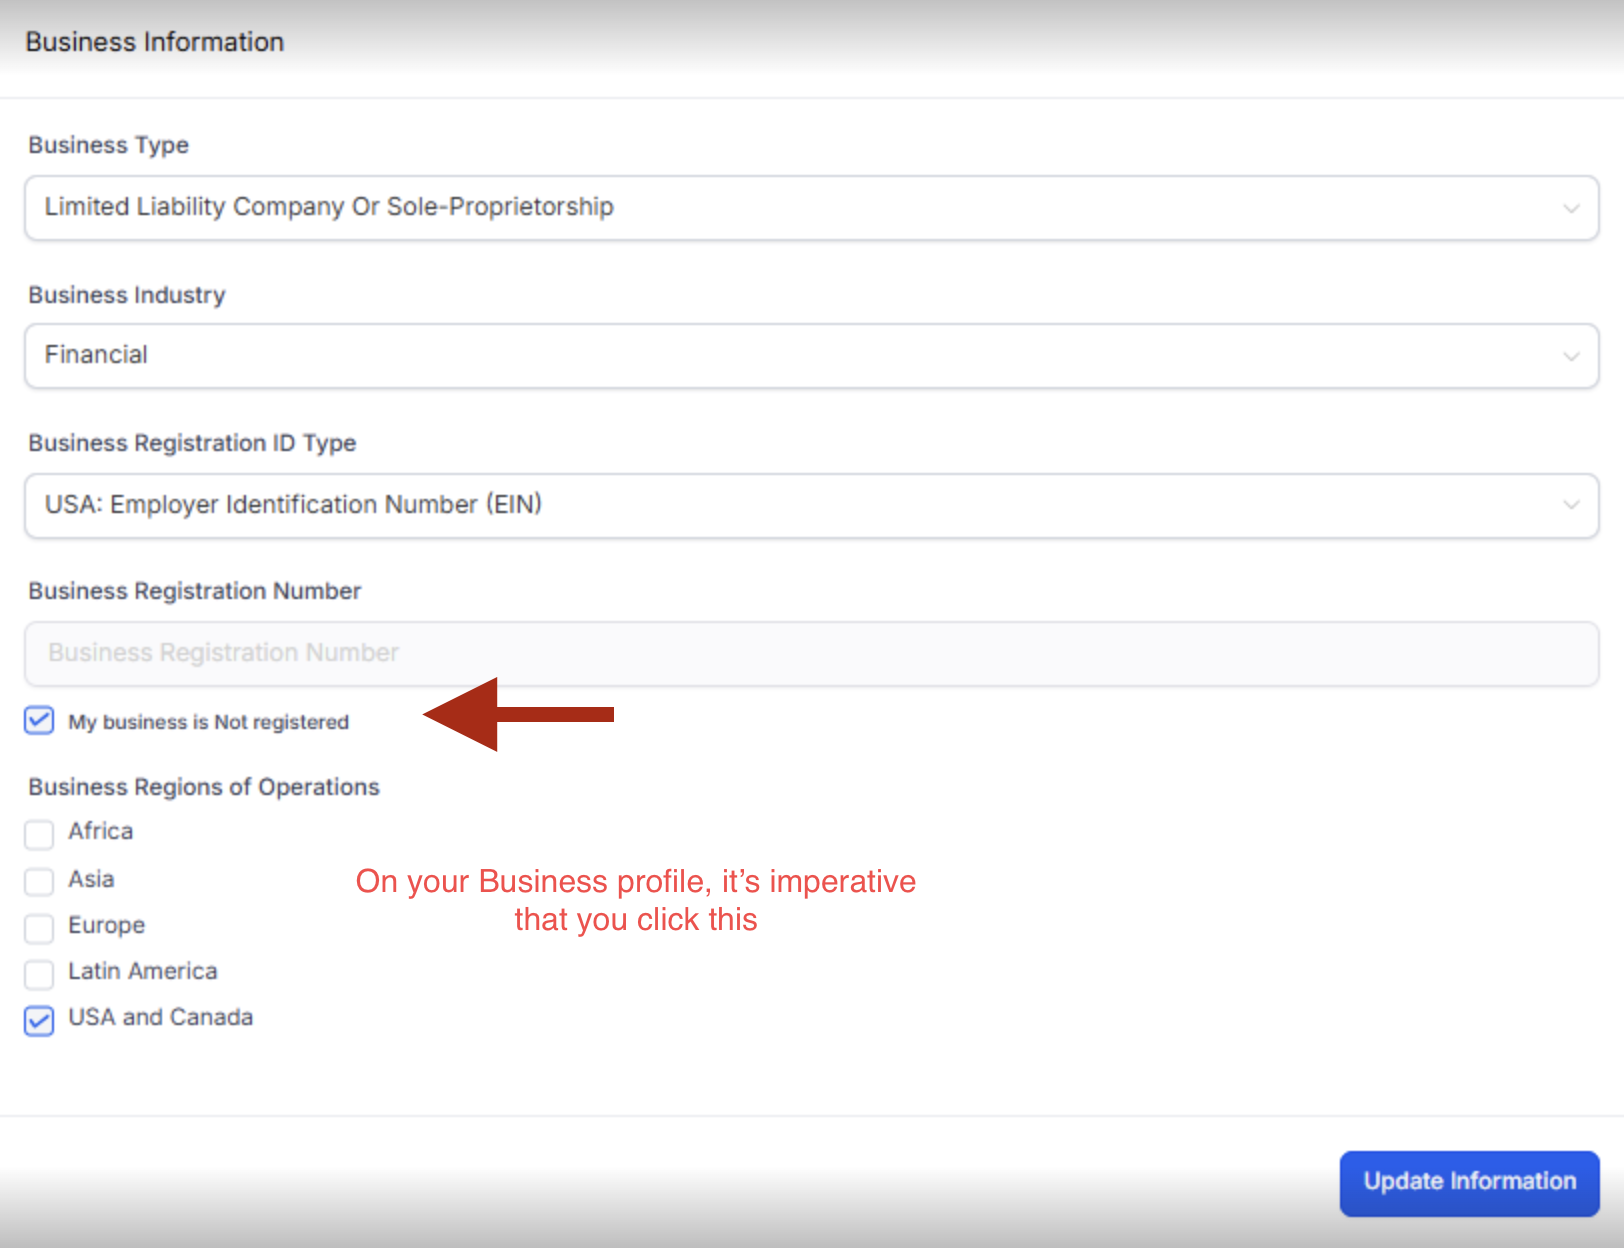
Business Profile Setup
Go to Settings > Business Profile > Business Information. You must check "My business is Not registered."
🛑 If you do not check "My business is Not registered," the application will fail.
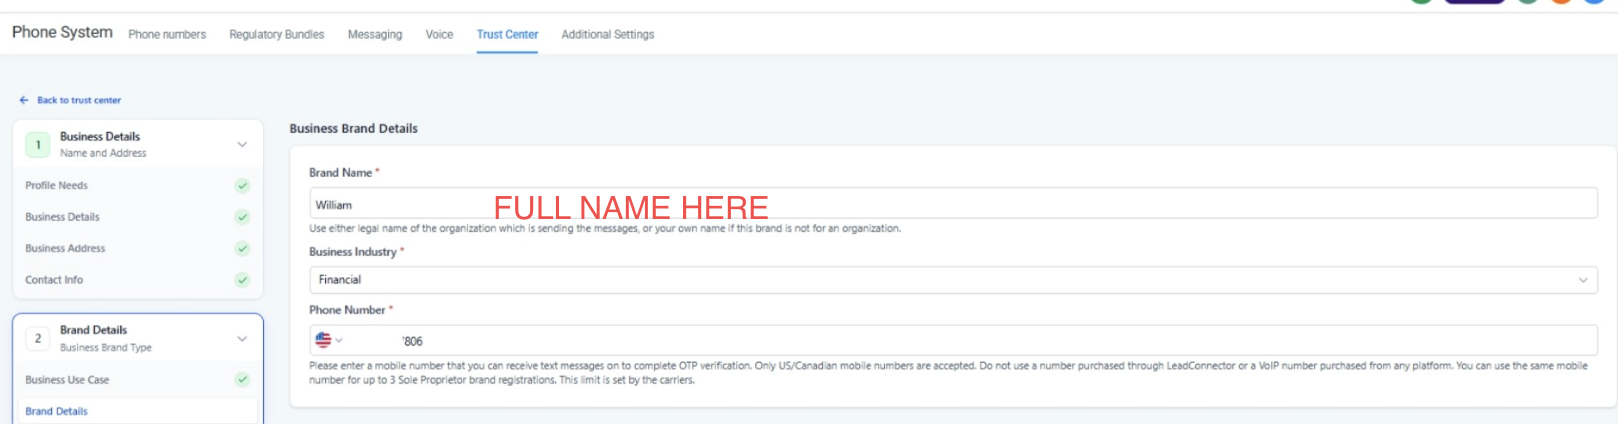
Business Brand Details
The Brand Name should be the client's full name.
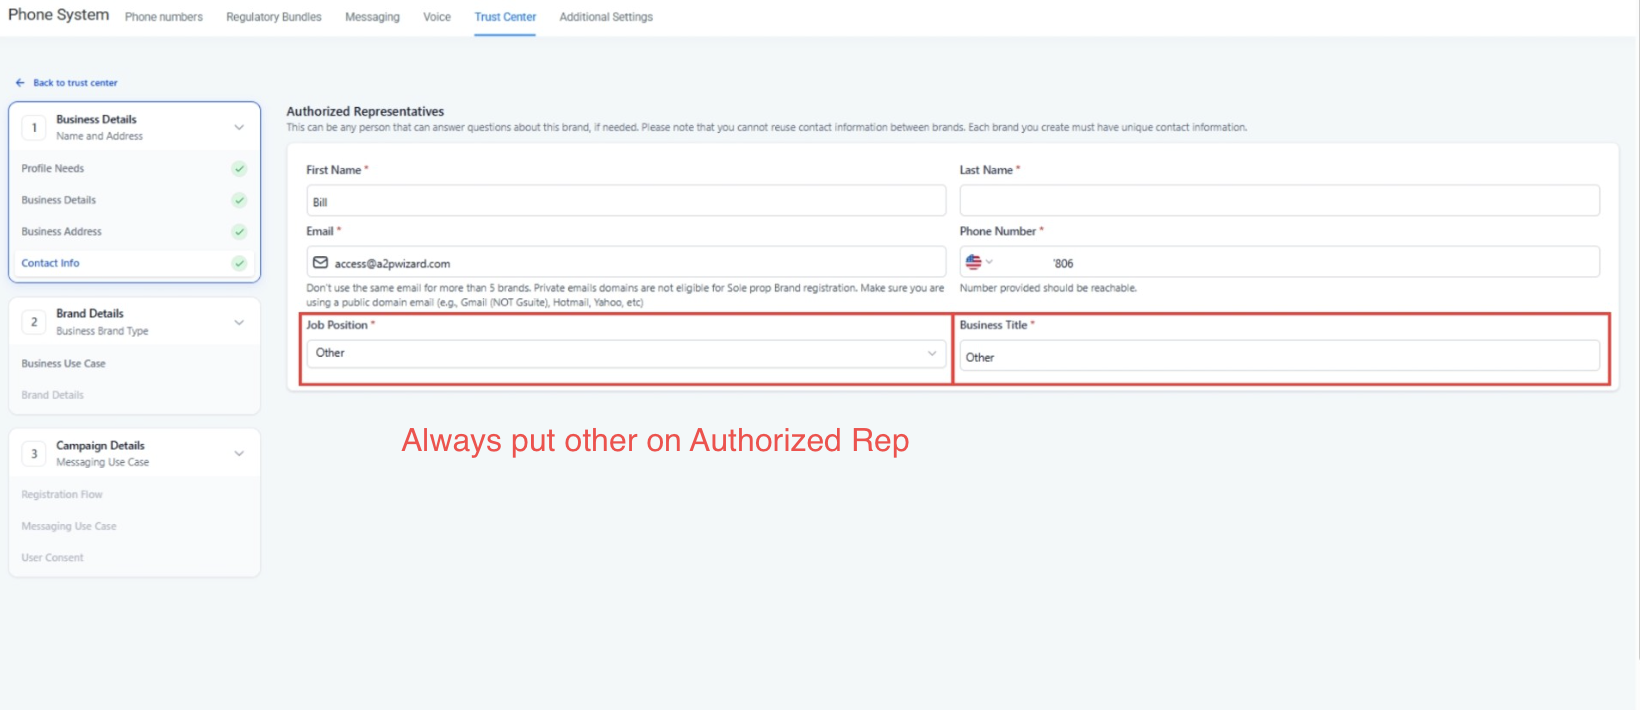
Authorized Representative
Use the name of the individual being registered. For Job Position and Business Title, always select "Other" for both.
For phone verification, The Campaign Registry needs to text a number for OTP. It says there's a limit of 3, but we've seen the same number used 20+ times without issue.
🛑 IMPORTANT: The email type decides whether you pass or fail.
No EIN? You MUST use a personal Gmail in the Authorized Representative email field. A professional or business email will cause the application to fail.
Have an EIN? A professional email can work, but we recommend trying a personal Gmail first. If you get a brand rejection, switch to the other.
✅ Use this
❌ Not this (no EIN)
Then: Manual Setup & Campaign Use Case
Choose "Manual Setup" (not Quick Setup) for the campaign.
Read carefully - depends on EIN
⛔ Campaign Use Case: get this right or you'll be rejected
What you do here depends on whether the Use Case field is locked or selectable:
✅ If it shows "Sole Proprietor" and is locked
That's a true sole prop (no EIN). Leave it as "Sole Proprietor." You can't change it and you don't need to. This is correct, don't panic.
🛑 If you CAN select a Use Case (has EIN)
If the field lets you pick, selecting anything else (Customer Care, Marketing, 2FA, etc.) gets you rejected. It must say Low Volume Mixed.
✅ Next: scroll down to "Copy These Exactly Into Your Application" for the use case, sample messages, and opt-in copy.
🔧 Twilio Direct
Registering A2P/10DLC directly in the Twilio console instead of through a CRM.
Everything you need is in this section, in the order Twilio's console asks for it. Complete the steps top to bottom.
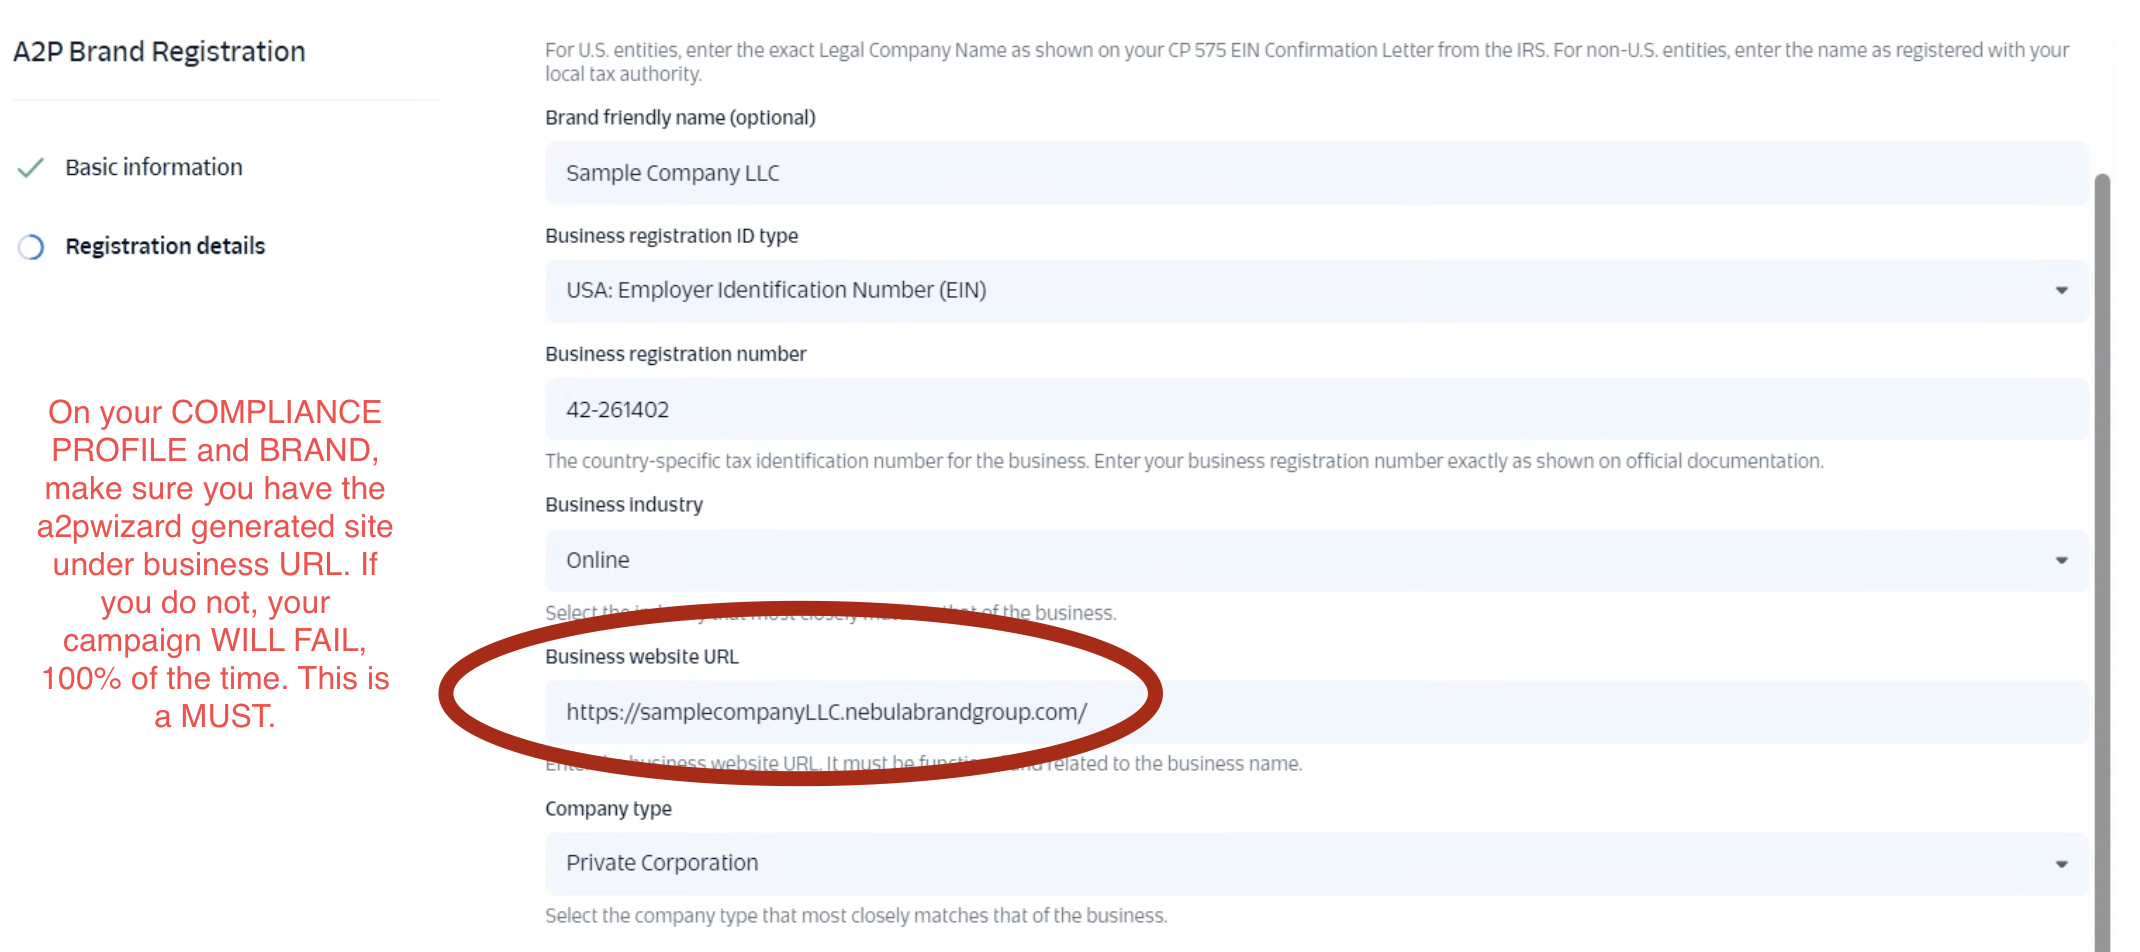
Follow the GOLDEN RULE when registering the brand: the A2P Wizard-generated website MUST be listed on both the compliance profile and the brand, or your campaign will fail.
👤 Registering as a sole proprietor / individual? Same flow, with these differences: set the entity type to Sole Proprietor, skip the EIN, use the individual's full name as the business name, and use a personal email for the contact. (Twilio's exact field names may differ slightly; the full step-by-step is coming here soon.)
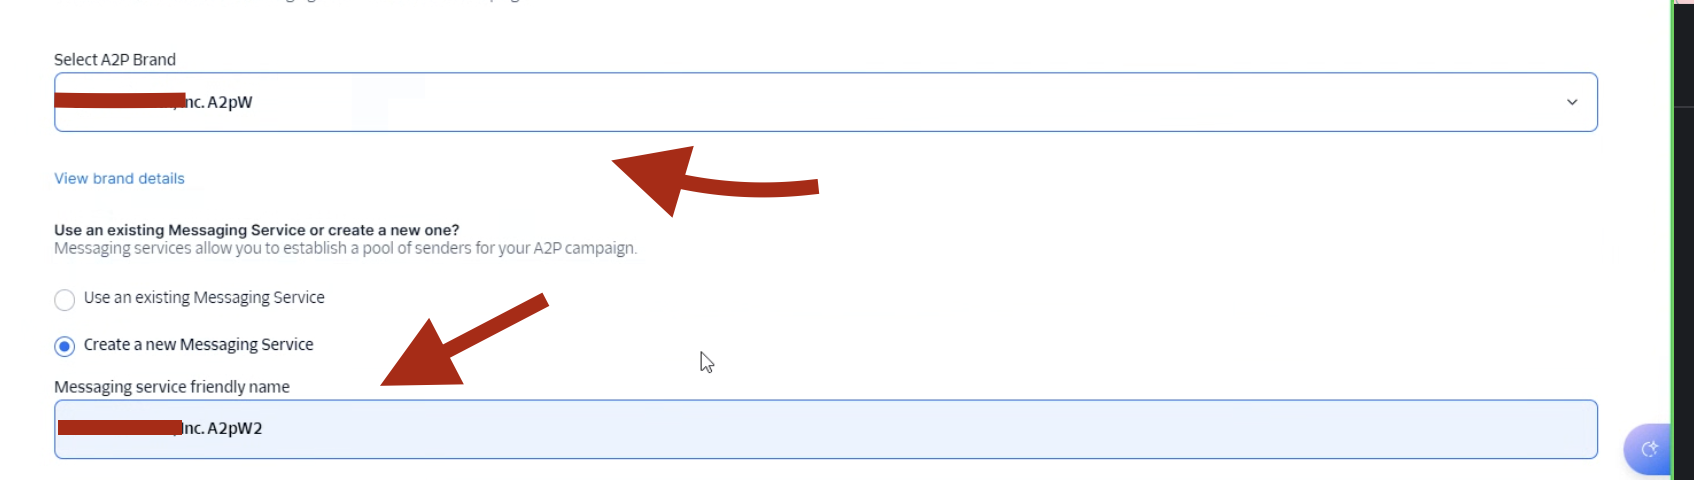
🛑 IMPORTANT: When registering the campaign, select the approved brand.
Make sure your brand has the A2P Wizard website on it before continuing. Then hit "Create new Messaging Service."
Do not skip - #1 cause of rejection
⛔ Select "Low Volume Mixed" or your campaign WILL be rejected
This is the single most common reason campaigns get denied. Picking anything else gets you rejected. It must say Low Volume Mixed, exactly as shown above.
🛑 If you glaze over this and select anything else, your campaign will fail. No exceptions.
Step 1: Campaign Description
Paste exactly as-is, do not edit or insert values.
Loading...
Step 2: Sample Messages
Twilio requires all 5. Paste exactly as-is, do not edit or insert values.
Sample Message #1:
Loading...
Sample Message #2:
Loading...
Sample Message #3:
Loading...
Sample Message #4:
Loading...
Sample Message #5:
Loading...
🛑 For the opt-in question, select "Web Form." If this is not selected, your campaign will fail.
Step 3: How do users consent to receive messages?
Paste exactly as-is, do not edit or insert values.
Loading...
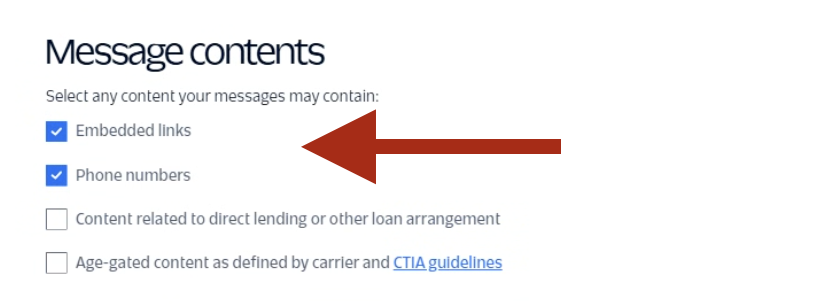
Step 4: Message Contents
💡 In the message contents selector, check only these two boxes: "Messages will include embedded links" and "Messages will include phone numbers." Leave the others unchecked.
Step 5: Sample of Embedded Links
Paste these as the sample links Twilio asks for.
Website Link:
Loading...
Privacy Policy Link:
Loading...
Terms Link:
Loading...
Step 6: Opt-in Keywords
When asked for opt-in keywords, enter: START and SUBSCRIBE
Step 7: Opt-In Message
⚠️ Do NOT modify this message. Paste it exactly as shown, including the brackets. [privacy_policy_link] and [terms_link] are intentional template placeholders. Do not replace them with actual URLs.
Loading...
 TextGrid Registration
Registering A2P/10DLC directly through TextGrid. Complete the steps top to bottom.
👤 Registering as a sole proprietor / individual? Same flow, with these differences: set the entity type to Sole Proprietor, skip the EIN, use the individual's full name as the business name, and use a personal email for the contact. (TextGrid's exact field names may differ slightly; the full step-by-step is coming here soon.)
Do not skip - #1 cause of rejection
⛔ Use Case: pick Low Volume Mixed, then both sub-use cases
Select Low Volume Mixed as the main use case first. Then, underneath it, pick both sub-use cases:
🛑 Both sub-use cases (Customer Care AND Marketing) must be selected under Low Volume Mixed. Picking the wrong use case is the #1 reason campaigns get rejected.
Step 1: Campaign Description
Paste exactly as-is, do not edit or insert values.
Loading...
Step 2: Call to Action / Message Flow
⚠️ This is the field TCR vetting partners enforce most heavily. Paste the copy below exactly, it describes how users give explicit consent.
Loading...
Step 3: Privacy Policy Link
Loading...
Step 4: Terms & Conditions Link
Loading...
Step 5: Sample Messages
TextGrid requires all 5. Paste exactly as-is, do not edit or insert values.
Sample Message #1:
Loading...
Sample Message #2:
Loading...
Sample Message #3:
Loading...
Sample Message #4:
Loading...
Sample Message #5:
Loading...
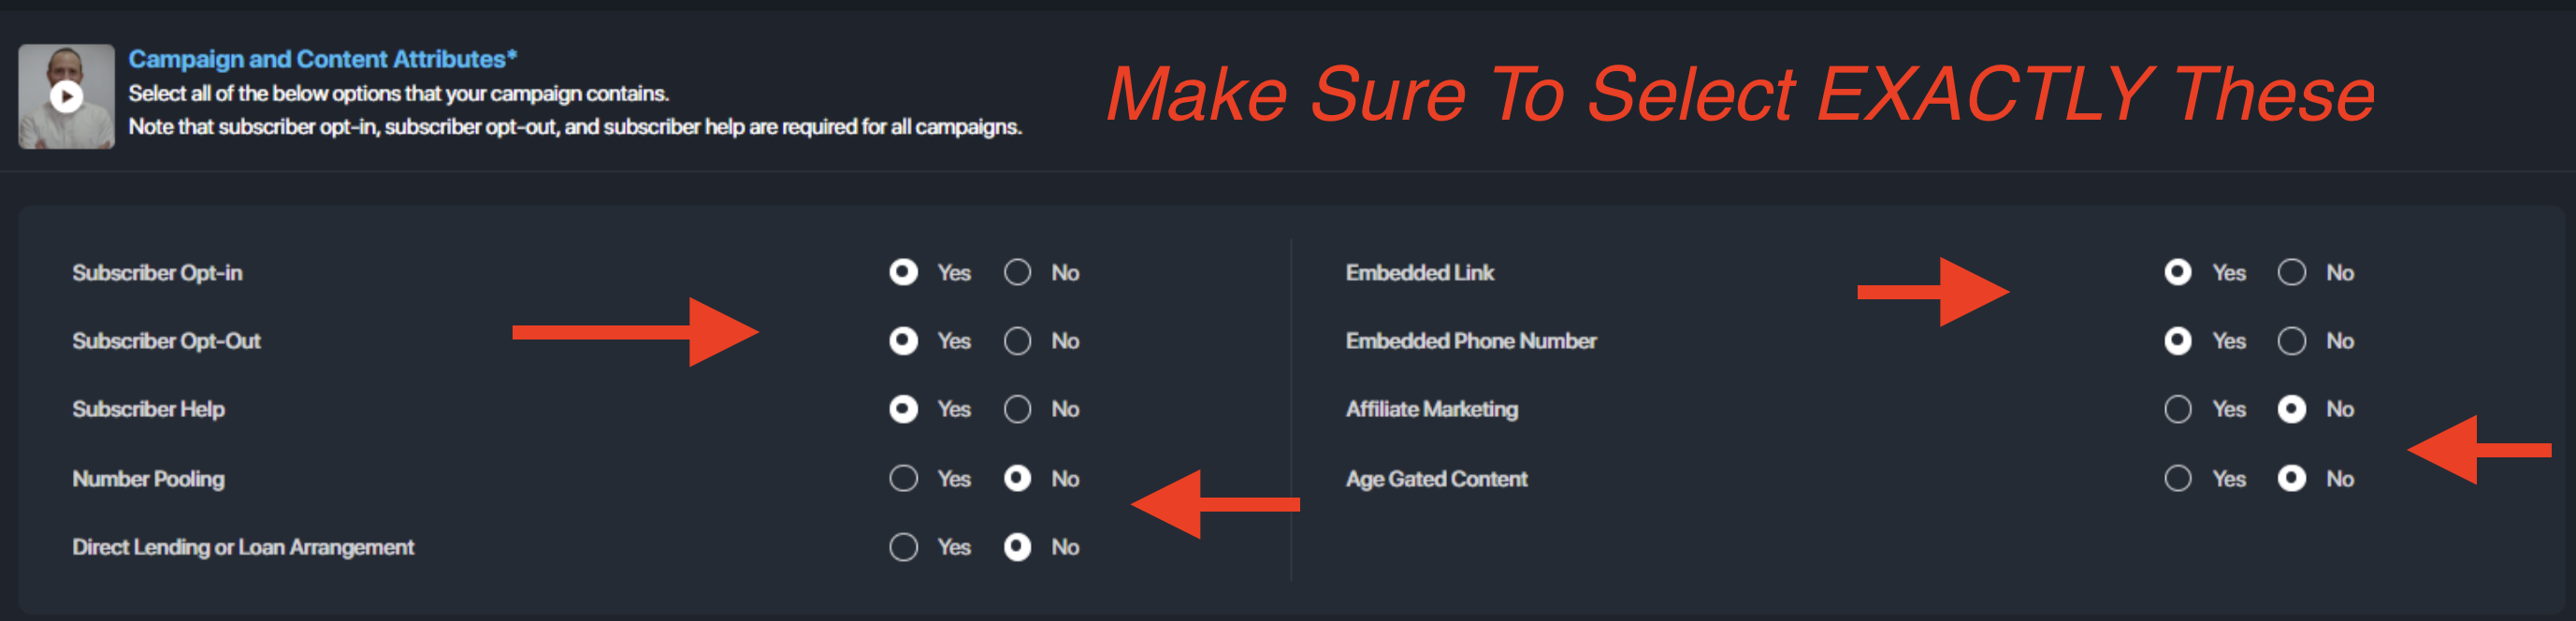
Step 6: Campaign & Content Attributes
🛑 Select EXACTLY these. Getting any of them wrong can cause a rejection.
- Subscriber Opt-in: Yes
- Subscriber Opt-Out: Yes
- Subscriber Help: Yes
- Number Pooling: No
- Direct Lending or Loan Arrangement: No
- Embedded Link: Yes
- Embedded Phone Number: Yes
- Affiliate Marketing: No
- Age Gated Content: No
💡 Tips for Approval
- Submit between 8am–11am on weekdays
- Use a fresh number/campaign if resubmitting
- Brand approval usually takes ~15 minutes
- Follow all best practices to avoid delays

⚠️ Website not generating? Make sure you did not use special characters in the company name. Special characters do not work for web addresses. 🙂
⚡ Want unlimited submissions & priority Slack support? Email admin@a2pwizard.com →
🔁 Ready to submit another?
Click Here to Start Over →